
适配安知鱼主题
感谢梦爱吃鱼提供的关于页魔改和张洪Heo提供的获取Token方法和GitHub的代码群友aspark提供的worker代码
在带有PHP主机部署 UmamiAPI 教程👇
「PHP主机部署UmamiAPI」
1. 准备工作
- 一个带有php的主机 (serv00的就可以)
- 已部署的Umami实例
- 已添加好Umami的网站
2. 首先进入Hoppscotch 获取token
- 复制以下代码添加到
Body处
{
    "username": "umami账户",
    "password": "umami密码"
}
https://你的Umami网站地址/api/auth/login
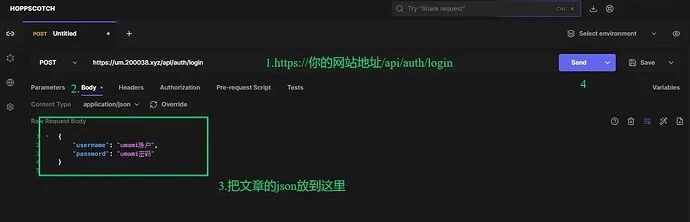
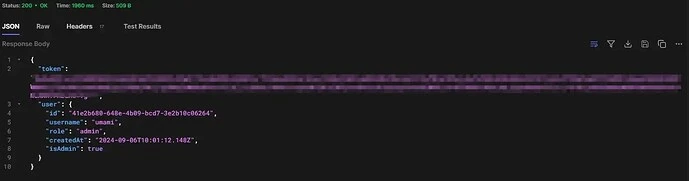
成功后会返回Token信息
- 然后访问
张洪HeoGithub修改的API下载,按照注释更改里面的地址、token和网站id。然后部署到网站的php项目中即可。
// 配置 Umami API 的凭据
$apiBaseUrl = 'https://xxxx';  // 你的网站ID
$token = '你的tocken';         // 上面网站获取的Tokeen
$websiteId = 'Umami你的网站id';  // Umami你的网站id
$cacheFile = 'umami_cache.json';
$cacheTime = 600; // 缓存时间为10分钟(600秒)
- 然后我们把刚刚下载修改好的文件修改后上传到serv00里面
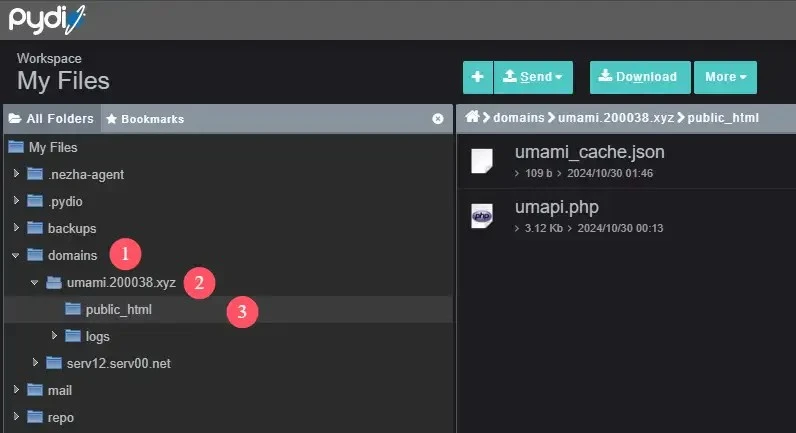
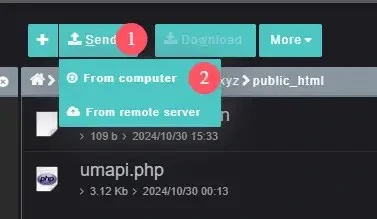
- 接下来我们访问你的域名/你的文件名就可以了。
比如我的是 : https://umami.200038.xyz/umapi.php 打开后如下图所示

在Cloudflare部署 Umami API 教程👇
「Cloudflare部署 Umami API」
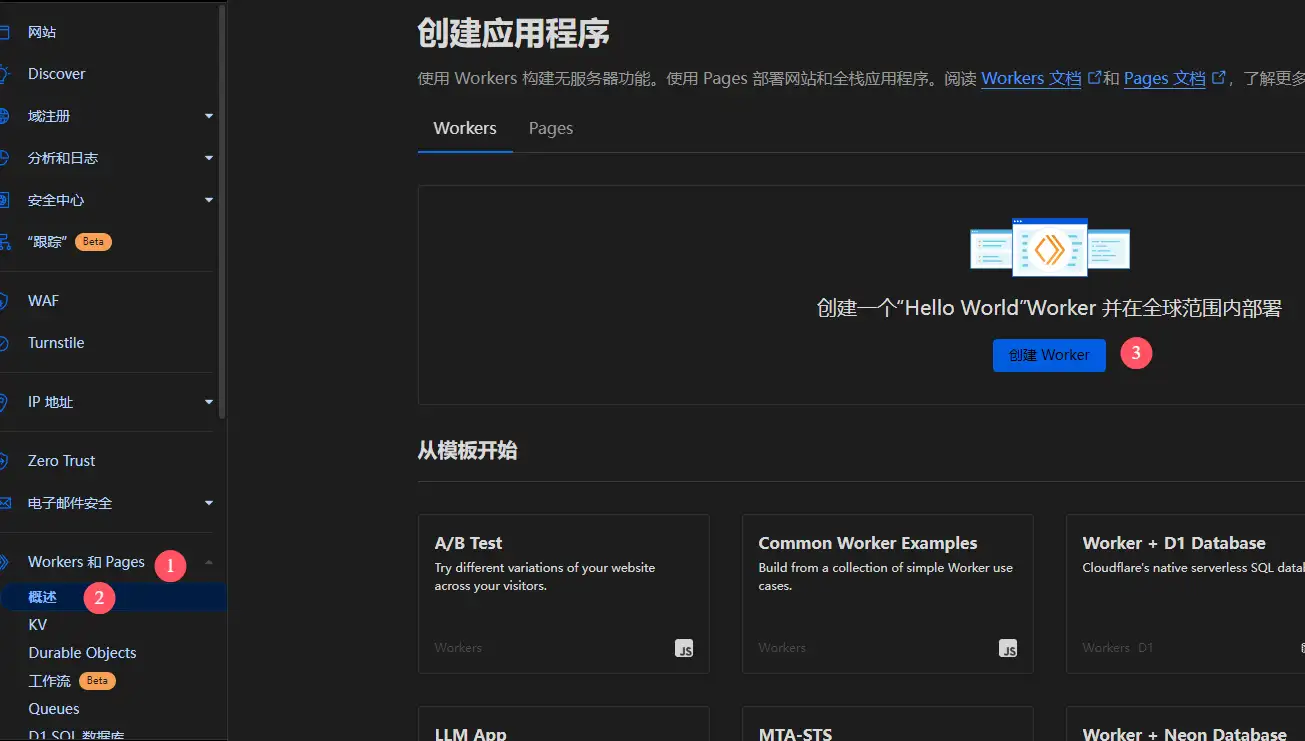
- 打开cloudflare官网进入到左边栏创建一个
Worker,名称随意点击部署
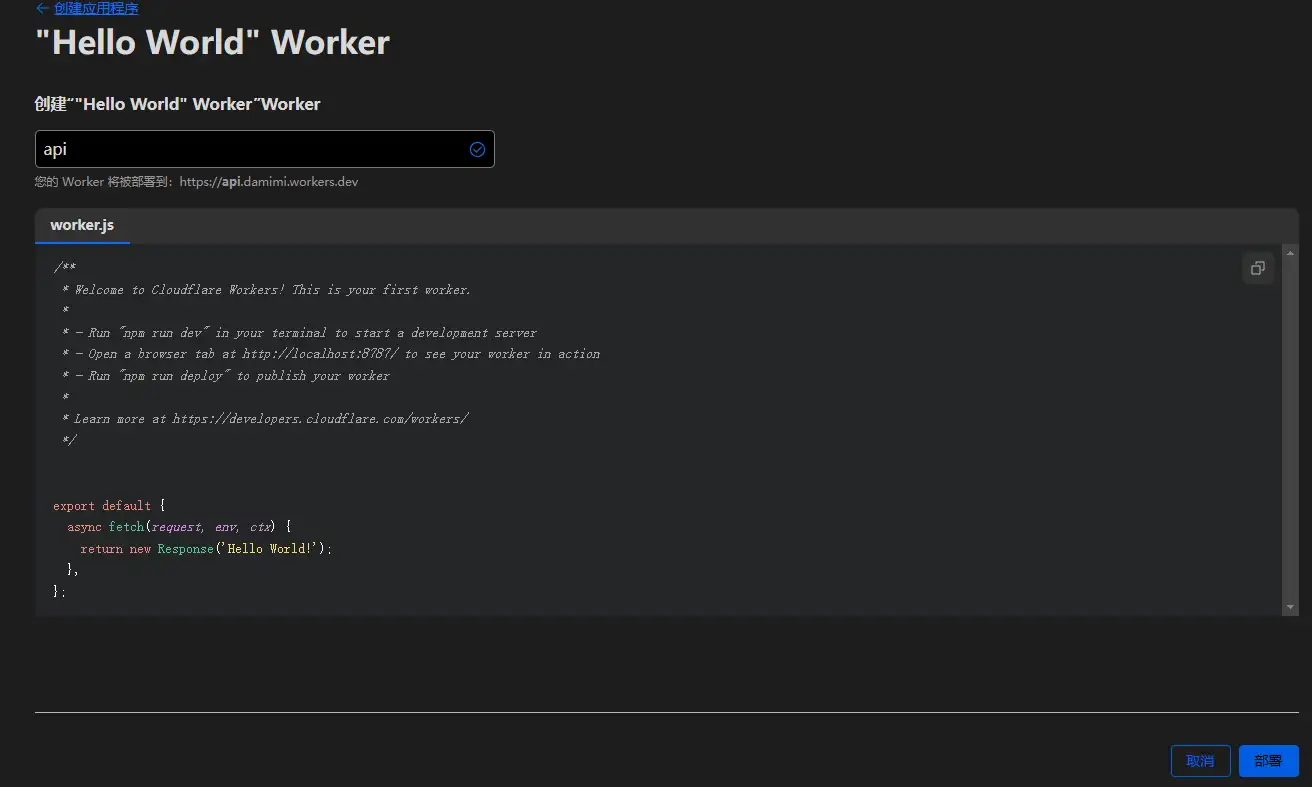
- 然后点击旁边的编辑代码,复制以下代码到
worker.js里面
addEventListener('fetch', event => {
  event.respondWith(handleRequest(event));
});

const API_BASE_URL = 'https://umami.yourdomain.com';
const TOKEN = 'your_token';
const WEBSITE_ID = 'your_website_id';
const CACHE_KEY = 'umami_cache';
const CACHE_TIME = 600; // Cache time in seconds

async function fetchUmamiData(startAt, endAt) {
  const url = `${API_BASE_URL}/api/websites/${WEBSITE_ID}/stats?startAt=${startAt}&endAt=${endAt}`;
  const response = await fetch(url, {
    headers: {
      'Authorization': `Bearer ${TOKEN}`,
      'Content-Type': 'application/json'
    }
  });

  if (!response.ok) {
    console.error(`Error fetching data: ${response.statusText}`);
    return null;
  }

  return response.json();
}

async function handleRequest(event) {
  const cache = await caches.open(CACHE_KEY);
  const cachedResponse = await cache.match(event.request);

  if (cachedResponse) {
    return cachedResponse;
  }

  const now = Date.now();
  const todayStart = new Date(now).setHours(0, 0, 0, 0);
  const yesterdayStart = new Date(now - 86400000).setHours(0, 0, 0, 0);
  const lastMonthStart = new Date(now).setMonth(new Date(now).getMonth() - 1);
  const lastYearStart = new Date(now).setFullYear(new Date(now).getFullYear() - 1);

  const [todayData, yesterdayData, lastMonthData, lastYearData] = await Promise.all([
    fetchUmamiData(todayStart, now),
    fetchUmamiData(yesterdayStart, todayStart),
    fetchUmamiData(lastMonthStart, now),
    fetchUmamiData(lastYearStart, now)
  ]);

  const responseData = {
    today_uv: todayData?.visitors?.value ?? null,
    today_pv: todayData?.pageviews?.value ?? null,
    yesterday_uv: yesterdayData?.visitors?.value ?? null,
    yesterday_pv: yesterdayData?.pageviews?.value ?? null,
    last_month_pv: lastMonthData?.pageviews?.value ?? null,
    last_year_pv: lastYearData?.pageviews?.value ?? null
  };

  const jsonResponse = new Response(JSON.stringify(responseData), {
    headers: {
      'Content-Type': 'application/json',
      'Access-Control-Allow-Origin': '*',
      'Access-Control-Allow-Methods': 'GET, POST, PUT, DELETE, OPTIONS',
      'Access-Control-Allow-Headers': 'Content-Type, Authorization'
    }
  });

  event.waitUntil(cache.put(event.request, jsonResponse.clone()));

  return jsonResponse;
}
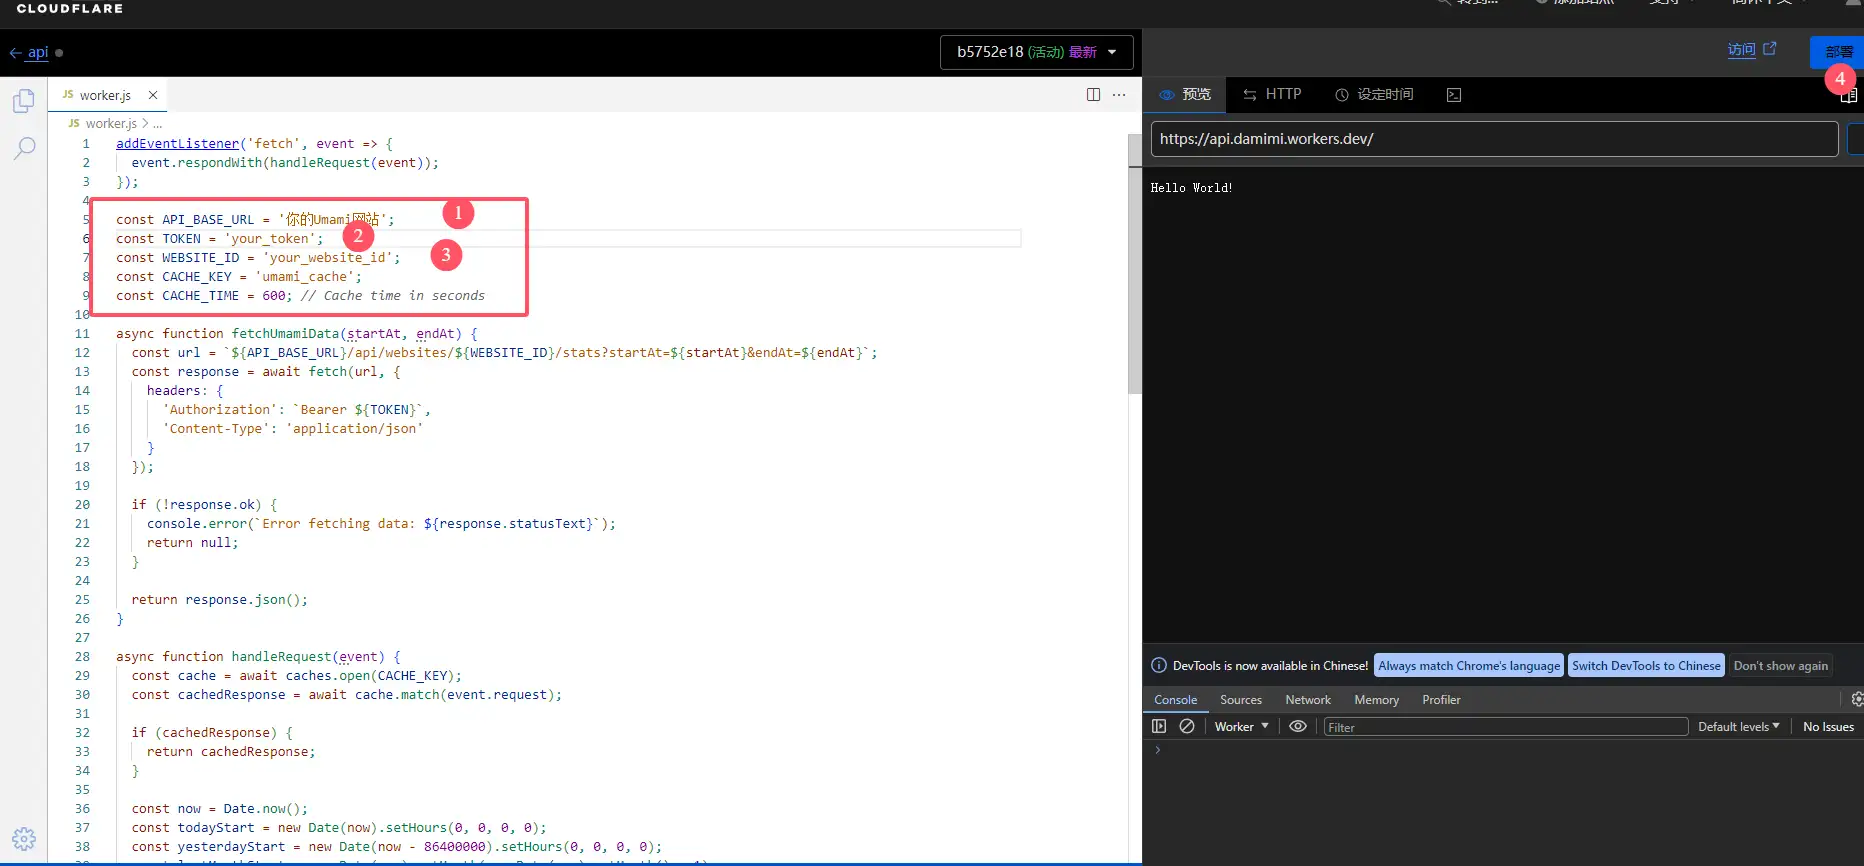
红框的代码修改是我们前面这个Hoppscotch网站获取的
修改代码里面红框标注的和上面PHP的修改方式一样,之修改三个就可以了、更改完点击部署
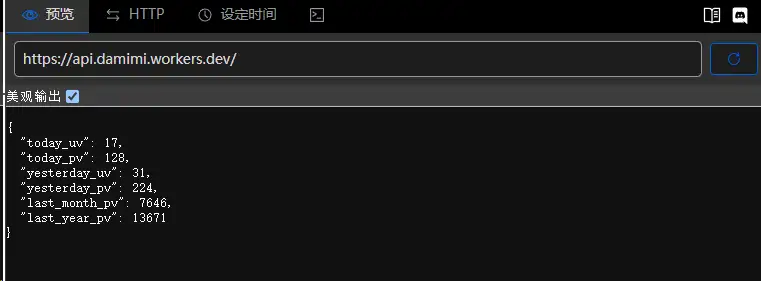
- 部署完成打开worker分配的域名显示以下效果就可以了.
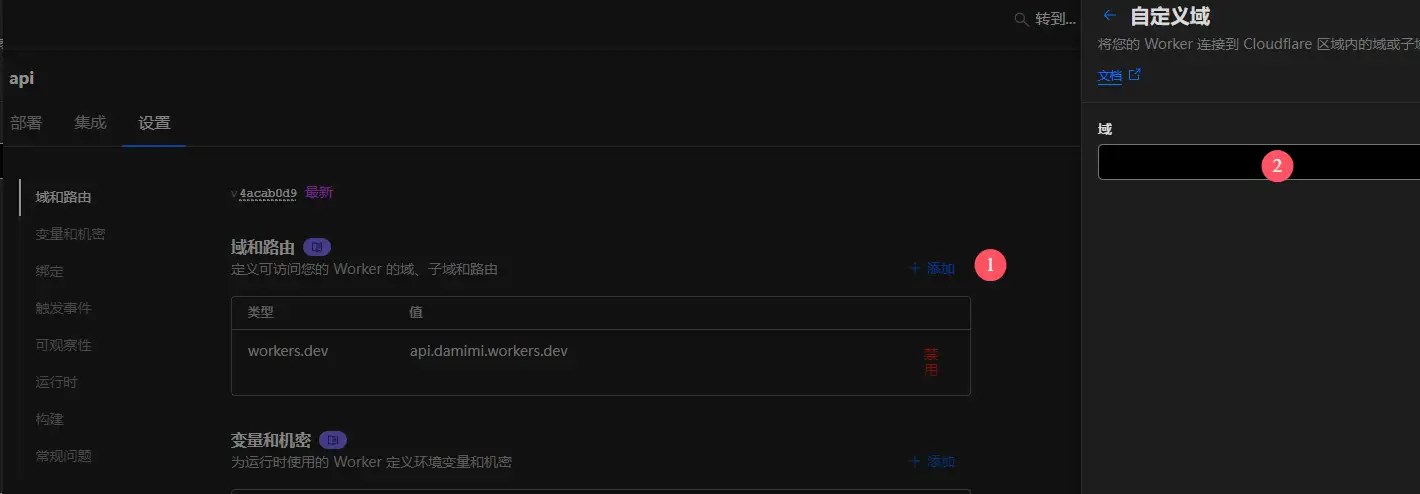
- 由于worker的域名被墙。需要添加一个托管在Cloudfalre上面的域名添加自定义域。
如何更改
UmamiAPI到安知鱼主题关于页面参考 梦爱吃鱼
1. 在 themes/anzhiyu/layout/includes/head.pug 添加
//- Umami
if theme.Umami
  if theme.Umami.umami_url
    script(async defer src=`${theme.Umami.umami_url_js}` data-website-id=`${theme.Umami.umami_id}` data-host-url=`${theme.Umami.umami_url}`)
  else
    script(async defer src=`${theme.Umami.umami_url_js}` data-website-id=`${theme.Umami.umami_id}`)
2. 然后修改 themes/anzhiyu/source/css/_page/about.styl
大致在1255行
- if (hexo-config('LA.enable')) {
+ if (hexo-config('LA.enable') || hexo-config('Umami.enable')) {
3. 接着修改 themes/anzhiyu/layout/includes/page/about.pug
//-  应该是91行
       .author-content
-        if theme.LA.enable
+        if theme.LA.enable || theme.Umami.enable
           - let cover = item.statistic.cover
           .about-statistic.author-content-item(style=`background: url(${cover}) top / cover no-repeat;`)
             .card-content
               .author-content-item-tips 数据
               span.author-content-item-title 访问统计
               #statistic
-              .post-tips
-                | 统计信息来自
-                a(href='https://invite.51.la/1NzKqTeb?target=V6', target='_blank', rel='noopener nofollow') 51la网站统计
+              if theme.LA.enable
+                .post-tips
+                  | 统计信息来自
+                  a(href='https://www.51.la/', target='_blank', rel='noopener nofollow') 51LA统计
+              else if theme.Umami.enable
+                .post-tips
+                  | 统计信息来自
+                  a(href='https://um.ruom.top', target='_blank', rel='noopener nofollow') Umami统计
               .banner-button-group
                 - let link = item.statistic.link
                 - let text = item.statistic.text
4. 继续修改 直接搜 - const ck = theme.LA.ck 把下面的全部替换
    //- Umami 统计 和 51LA 统计
    if theme.Umami && theme.Umami.enable
      script(defer).
        (function() {
          const umamiApiUrl = "#{url_for(theme.Umami.umami_api)}";
          fetch(umamiApiUrl)
            .then(res => res.json())
            .then(data => {
              let title = {
                "today_uv": "今日人数",
                "today_pv": "今日访问",
                "yesterday_uv": "昨日人数",
                "yesterday_pv": "昨日访问",
                "last_month_pv": "本月访问",
                "last_year_pv": "本年访问"
              };
              let s = document.getElementById("statistic");
              for (let key in data) {
                if (data.hasOwnProperty(key) && title[key]) {
                  s.innerHTML += `<div><span>${title[key]}</span><span id="${key}">${data[key]}</span></div>`;
                }
              }
              initCountUp(data, title);
            })
            .catch(error => console.error('Error:', error));
        })();
    else
      script(defer).
        function initAboutPage() {
          fetch("https://v6-widget.51.la/v6/#{ck}/quote.js")
            .then(res => res.text())
            .then(data => {
              let title = ["最近活跃", "今日人数", "今日访问", "昨日人数", "昨日访问", "本月访问", "总访问量"];
              let num = data.match(/(<\/span><span>).*?(\/span><\/p>)/g);

              num = num.map(el => {
                let val = el.replace(/(<\/span><span>)/g, "");
                let str = val.replace(/(<\/span><\/p>)/g, "");
                return str;
              });

              let statisticEl = document.getElementById("statistic");

              // 自定义不显示哪个或者显示哪个,如下为不显示 最近活跃访客 和 总访问量
              let statistic = [];
              for (let i = 0; i < num.length; i++) {
                if (!statisticEl) return;
                if (i == 0) continue;
                statisticEl.innerHTML +=
                  "<div><span>" + title[i] + "</span><span id=" + title[i] + ">" + num[i] + "</span></div>";
                queueMicrotask(() => {
                  statistic.push(
                    new CountUp(title[i], 0, num[i], 0, 2, {
                      useEasing: true,
                      useGrouping: true,
                      separator: ",",
                      decimal: ".",
                      prefix: "",
                      suffix: "",
                    })
                  );
                });
              }

              let statisticElement = document.querySelector(".about-statistic.author-content-item");
              function statisticUP() {
                if (!statisticElement) return;

                const callback = (entries, observer) => {
                  entries.forEach(entry => {
                    if (entry.isIntersecting) {
                      for (let i = 0; i < num.length; i++) {
                        if (i == 0) continue;
                        queueMicrotask(() => {
                          statistic[i - 1].start();
                        });
                      }
                      observer.disconnect(); // 停止观察元素,因为不再需要触发此回调
                    }
                  });
                };

                const options = {
                  root: null,
                  rootMargin: "0px",
                  threshold: 0
                };
                const observer = new IntersectionObserver(callback, options);
                observer.observe(statisticElement);
              }

              statisticUP();
              initCountUp({}, {});
            });

          initAnimation();
        }
        if (typeof gsap === "object") {
          initAboutPage()
        } else {
          getScript("!{url_for(theme.asset.gsap_js)}").then(initAboutPage);
        }

    //- 初始化 countup.js
    script(defer).
      function initCountUp(data, title) {
        const elements = [];

        for (let key in data) {
          if (data.hasOwnProperty(key) && title[key]) {
            const element = document.getElementById(key);
            if (element) {
              elements.push({ id: key, value: data[key], element: element });
            }
          }
        }

        const selfInfoContentYearElement = document.getElementById("selfInfo-content-year");
        if (selfInfoContentYearElement) {
          elements.push({ id: "selfInfo-content-year", value: #{selfInfoContentYear}, element: selfInfoContentYearElement });
        }

        const observer = new IntersectionObserver((entries) => {
          entries.forEach(entry => {
            if (entry.isIntersecting) {
              const target = elements.find(el => el.element === entry.target);
              if (target) {
                const countUp = new CountUp(target.id, 0, target.value, 0, 2, {
                  useEasing: true,
                  useGrouping: target.id === "selfInfo-content-year" ? false : true,
                  separator: ",",
                  decimal: ".",
                  prefix: "",
                  suffix: "",
                });
                countUp.start();
                observer.unobserve(entry.target);
              }
            }
          });
        }, { threshold: 0 });

        elements.forEach(el => observer.observe(el.element));
      }

    //- 独立鼠标跟随动画
    script(defer).
      function initAnimation() {
        var pursuitInterval = null;
        pursuitInterval = setInterval(function () {
          const show = document.querySelector("span[data-show]");
          const next = show.nextElementSibling || document.querySelector(".first-tips");
          const up = document.querySelector("span[data-up]");

          if (up) {
            up.removeAttribute("data-up");
          }

          show.removeAttribute("data-show");
          show.setAttribute("data-up", "");

          next.setAttribute("data-show", "");
        }, 2000);

        document.addEventListener("pjax:send", function () {
          pursuitInterval && clearInterval(pursuitInterval);
        });

        var helloAboutEl = document.querySelector(".hello-about");
        helloAboutEl.addEventListener("mousemove", evt => {
          const mouseX = evt.offsetX;
          const mouseY = evt.offsetY;
          gsap.set(".cursor", {
            x: mouseX,
            y: mouseY,
          });

          gsap.to(".shape", {
            x: mouseX,
            y: mouseY,
            stagger: -0.1,
          });
        });
      }
      if (typeof gsap === "object") {
        initAnimation()
      } else {
        getScript("!{url_for(theme.asset.gsap_js)}").then(initAnimation);
      }
5. 最后在主题的 config.yml 配置项内添加
# Umami
Umami:
  enable: true # 开关
  umami_url_js: https://umami.biuxin.com/script.js # 填写 umami js地址 可以使用第三方CDN加速但需要配置下面的 umami_url
  umami_id: d4662f99-6e33-4665-9ae0-db72eda07b0b # 填写 umami 统计 ID
  umami_api: https://umami.200038.xyz/umapi.php # 填写 umami API 地址
  umami_url:   #填写 umami 服务器地址 使用 CDN 加速 Umami 静态资源后需配置此项
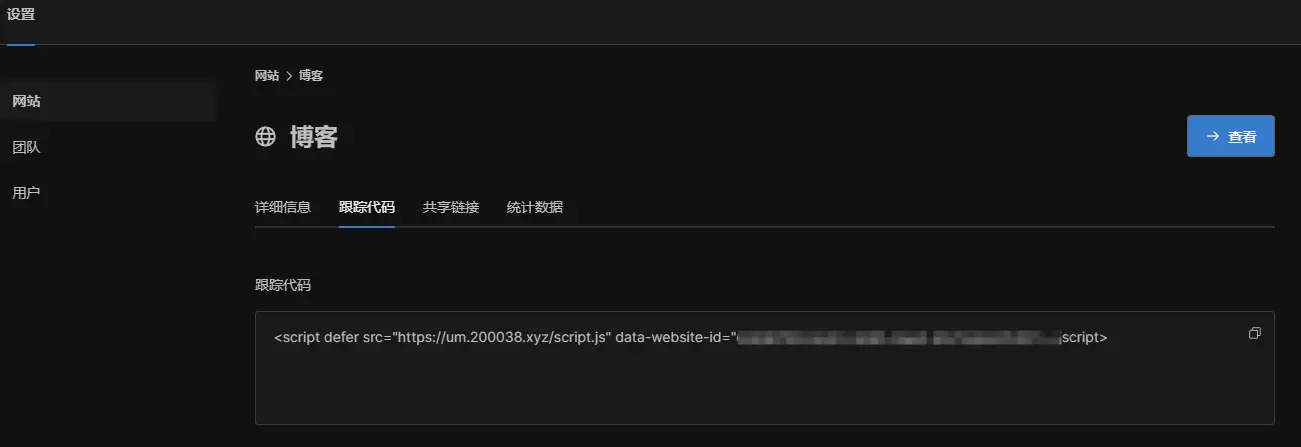
- 不想更改也可以把 Umami 添加的网站引入到主题
head或bottom处 我一般添加到头部。我也是初学者哈哈哈
添加到主题更改我们只能从
Umami网站中看到访问记录
评论区